Canvas Tools
Table of Contents
Cropping
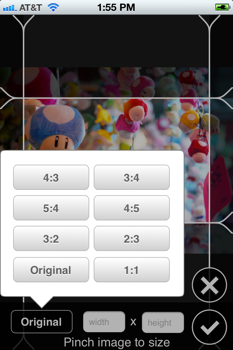
Cropping is perhaps the most common change applied to any image. As such it has occupies the first position in the Canvas tab when you begin editing an image. The text fields above the crop button allow you to specify a ratio such as 5x4, 1x1, etc. If you leave these fields blank, the ratio will be automatically set to the original ratio of the image. Tapping the crop button brings up the cropping interface as pictured below. The area inside of the white lines will be the final image. You can pinch to zoom the image, and move it around to reposition. If you want to change the cropping ratio at this point, you can drag around the cropping lines as well.
There are a number of buttons on the bottom left on the screen to set common ratios. 4:3, 5:4, etc. The 'original' button will set the cropping ratio to that of the image as it currently exists.
Scale to Fit
Filterstorm 1 & 2 both had a scale feature, and if you scroll down to the bottom of the Canvas controls, this scale feature still exists. However, it's usually more useful to define a box in which you want the image to fit, and scale it to match. This is how the "Scale to Fit" function works. If you set a width of 3000px and a height of 3000px, whichever side of the image is longer will end up exactly 3000px, and the other side will be appropriately shorter.
If you're just editing one image, this doesn't make a huge difference from the traditional scale feature, for which you would just take the longer side and set it to 3000px. The big differences are that since the values of these fields are saved, if you always scale to a long side of 3000px, you can just press the scale button without resetting the fields on your next image. Also when you use the scale function in an automation, it will scale whatever image you give it to those exact pixel dimensions. This will distort the image if the original ratio wasn't identical. Scaling to fit lacks this problem.
Borders
The borders tool provides a mechanism to apply a simple frame to an image and can be applied with or without text. It is important to note that adding borders increases the overall size of the image, so if you want the final image to be an exact size, you should scale it after adding the border.
The first three options are the colors of the border. The border and text colors should be self-explanatory. The outline color is the color of the one pixel wide outside edge of the border which you can turn on and off. The default is a white border with black text, and a light gray outline.
If you enter text into the text box, the height of either the top or bottom edge of the image will be set to twice that of the rest of the edges, and the size of the text will be set to match.
The shadow control determines the size of a drop shadow the border casts onto the image (not the other way around).
Canvas Size
If you need padding on one edge of the image, or perhaps want to letterbox or pillarbox the image to get to a certain ratio, you can use the canvas size tool to get the desired size. All it does is allow you to set a new image size, the canvas size will be changed, but the image will remain the same size, with blank space around it, or partially cropped (or both).