Editing Images
Table of Contents
- Banner Image Demonstration Video
- Cropping
- Scale to Fit
- Borders
- Watermarks
- Canvas Size
- What Are Curves?
- FSPro's Curves
- Text
Banner Image Demonstration
Cropping
Cropping is perhaps the most common change applied to any image. As such it has occupies the first position in the Canvas tab when you begin editing an image. The text fields above the crop button allow you to specify a ratio such as 5x4, 1x1, etc. If you leave these fields blank, the ratio will be automatically set to the original ratio of the image. Tapping the crop button brings up the cropping interface as pictured below. The area inside of the white lines will be the final image. You can pinch to zoom the image, and move it around to reposition. If you want to change the cropping ratio at this point, you can drag around the cropping lines as well.
There are a number of buttons on the bottom left on the screen to set common ratios. 4:3, 5:4, etc. The bottom two are marked 'original' and 'user'. The 'original' button will set the cropping ratio to that of the image as it currently exists. The user button will reset the cropping ratio to the ratio entered into the text fields before the cropping button was pressed. If you had left those fields blank, it will set the cropping ratio to 1:1.

Scale to Fit
Filterstorm 1 & 2 both had a scale feature, and if you scroll down to the bottom of the Canvas controls, this scale feature still exists. However, it's usually more useful to define a box in which you want the image to fit, and scale it to match. This is how the "Scale to Fit" function works. If you set a width of 3000px and a height of 3000px, whichever side of the image is longer will end up exactly 3000px, and the other side will be appropriately shorter.
If you're just editing one image, this doesn't make a huge difference from the traditional scale feature, for which you would just take the longer side and set it to 3000px. The big differences are that since the values of these fields are saved, if you always scale to a long side of 3000px, you can just press the scale button without resetting the fields on your next image. Also when you use the scale function in an automation, it will scale whatever image you give it to those exact pixel dimensions. This will distort the image if the original ratio wasn't identical. Scaling to fit lacks this problem.
Borders
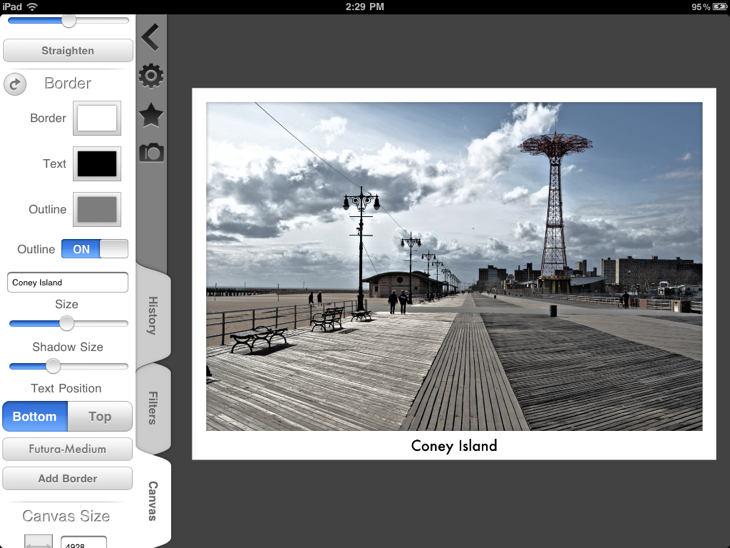
The borders tool—located in the Canvas tab—provides a mechanism to apply a simple frame to an image and can be applied with or without text. It is important to note that adding borders increases the overall size of the image, so if you want the final image to be an exact size, you should scale it after adding the border.
The first three options are the colors of the border. The border and text colors should be self-explanatory. The outline color is the color of the one pixel wide outside edge of the border which you can turn on and off. The default is a white border with black text, and a light gray outline.
If you enter text into the text box, the height of either the top or bottom edge of the image will be set to twice that of the rest of the edges, and the size of the text will be set to match.
The shadow control determines the size of a drop shadow the border casts onto the image (not the other way around).
 ]
]
Watermarks
Canvas Size
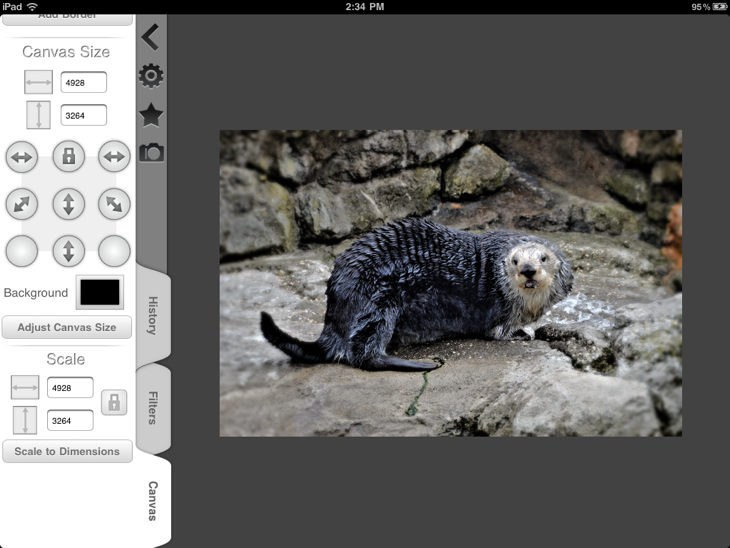
If you need padding on one edge of the image, or perhaps want to letterbox or pillarbox the image to get to a certain ratio, you can use the canvas size tool to get the desired size. All it does is allow you to set a new image size, the canvas size will be changed, but the image will remain the same size, with blank space around it, or partially cropped (or both).

What are Curves?

Curves are a way to alter the brightness and contrast of an image. Curves work somewhat similarly to the equalizer on a sound system (A more accurate analogy would be to a dynamics processor). However, instead of making bass sounds or treble sounds relatively louder or softer, with curves you can make the dark areas or light areas darker or lighter. In this way you can increase or decrease contrast, and control in a sense where that contrast occurs.
From left to right, the curves graph goes from dark to bright, just as the equalizer goes from bass to treble. However unlike the equalizer, the vertical component of the graph also goes from dark to light, rather than quiet to loud. This is why the base line of the curves is diagonal. The bottom left point means that "pixels which are initially black (are on the left) will remain black (on the bottom)". The top right point similarly means that "pixels which are initially white (on the right) will remain white (on the top)".
Similarly the center point from left to right starts as the center point from bottom to top. If you pull this center point up, it means pixels originally of medium brightness (center left to right) will in the resulting image be brighter, since they are now higher from the center from bottom to top. In this manner, the curves displayed at the beginning of this segment show an image in which the shadows are lightened in order to reveal shadow detail, whereas the bright areas of the image remain mostly unchanged. Everything of less than middling brightness in the resulting image will be brighter than it was originally.
FSPro's Curves

FSPro's curves work fairly similarly to most other curves with a few differences. On many desktop programs, clicking somewhere on the curve without a point will add a new point. Due to the imprecise nature of fingers, this is not true in FSPro. When you place your finger down on the curve control, FSPro determines which point is closest to your finger. When you slide your finger, it moves that point. If you wish to add a new point to the curve, tap the "add point" button, then your next tap will create a new point under your finger.
Text
The "Banner Image Demonstration" video on this page contains at the end usage of the text tool which may be useful.
The text tool is in FSPro is not unlike that in many other applications. You can set the text, color, size, font, and alignment in the controls. What is different is that the size and position can be altered from the controls, but also by pinching to zoom, and moving of the image on which the text is to be situated. This can make it very easy to place text where you want it very quickly.