Metadata, Export, Backups
Introduction
Filterstorm Pro (FSPro) is a powerful piece of software meant to make tagging and sending images as quick as possible. While most functions are meant to be easily discoverable by the user, some functions which can speed up use are not immediately apparent.
Table of Contents
- Star Ratings
- IPTC Setup
- IPTC Batch Editing
- Saving & Editing IPTC Sets
- Applying IPTC Sets
- Exporting/Importing IPTC Sets
- Export Setup (Flickr, FTP, Dropbox, etc.)
- Exporting Images
- iTunes Sharing
- Saving Backups
- Restoring From Backups
Star Ratings
FSPro has three methods to assign star-ratings to images. The first method is to select the images you want to rate, then tap the star icon in the toolbar and use the "rate" slider to assign a number of stars to all the images selected. This method is great for picking out an initial batch of images of at least one star so you can then filter them using the filter star slider in the popover. The second method is to place two fingers on the thumbnail of the image you want to select, and slide them downwards. The stars rating will increase as you slide down, and decrease if you slide back up. The third method is to use "quick view" mode. To enter quick view mode do a "pinch open" gesture on an image thumbnail. It will show a full-screen version of the image with a star rating tool and edit button on the bottom. You can swipe left and right to get to the next and previous images.
IPTC Setup
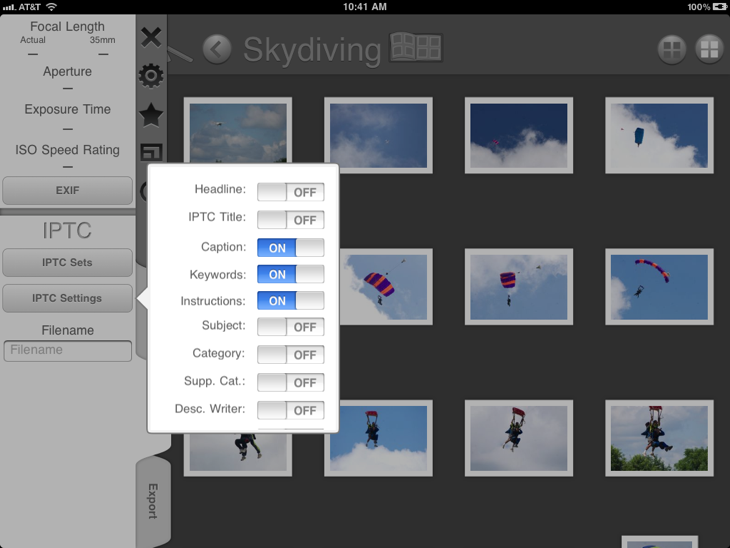
When you first start up FSPro, the IPTC section of the metadata tab doesn't display any fields. FSPro supports many IPTC tags which can be enabled by tapping the IPTC settings button, which will bring up a popover as shown below. The fields you select will appear below the filename field, allowing you to have quick access to only the fields you use regularly.
IPTC Batch Editing
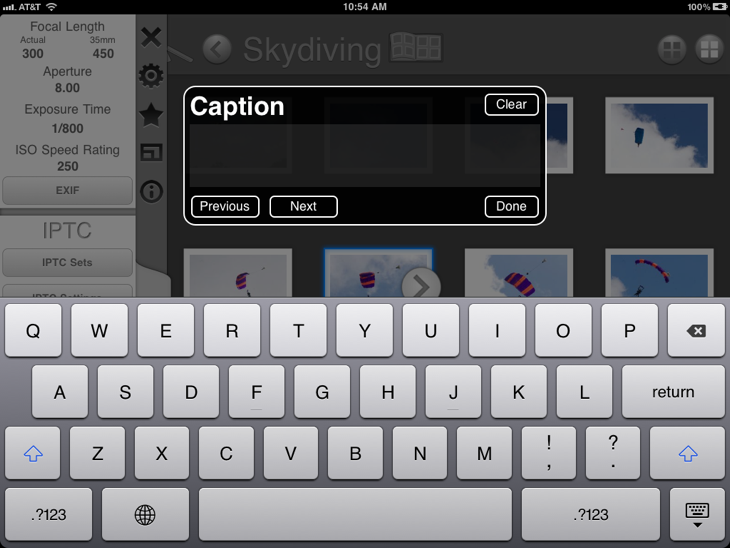
Whenever you tap on one of the text fields in the IPTC section of the metadata tab, a text input pane will come up as in the below image. The text you enter will be applied to the appropriate field on every image you have currently selected. If you select an album, it will edit the entire thing. You can use the next and previous buttons to change the IPTC field you are editing. To save commonly used IPTC information, please refer to the sections on using IPTC Sets.
Saving & Editing IPTC Sets
In the metadata tab under IPTC is the IPTC set button which will bring up a popover containing sets of saved IPTC information; by default an empty list. Tapping the plus button will add a new set to the list and bring up a sheet containing all the supported IPTC fields. Once filled out, you can later edit the information by going to the IPTC set popover and tapping and holding on the item you want to edit in the list, and delete them by scrolling down to the end of the sheet to find the delete button. Only the fields you fill out will be applied to images. If the image you apply the set to has a caption, for example, and the set has no caption inserted, the original caption of the image will be preserved.
Applying IPTC Sets
Applying IPTC sets works just like applying automations. Tapping the IPTC Sets button brings up the popover containing your saved IPTC sets. Tapping any of the items in the list will apply the metadata from that set onto all selected images. Only the fields that are not blank in the set will be applied. If the image you apply the set to has a caption, for example, and the set has no caption inserted, the original caption of the image will be preserved.
Exporting/Importing IPTC Sets
IPTC sets can be emailed by going to the IPTC Set popover, tapping and holding on the set you want to email until the IPTC Set sheet comes up then tapping the e-mail button at the top of the sheet. If you are emailed .fsiptcset file, you can open it by tapping and holding it, then selecting to open in FSPro.
Export Setup (Flickr, FTP, Dropbox, etc.)
Export destinations are all setup in similar ways. In the export tab, tapping the "+" icon at the end of the Destinations list will add a new destination and bring up its options. If you want to see these options for any of the existing items in the Destination list, tapping and holding the item in the list will bring it up.

After entering a name and type for the export destination, you can choose which files to send. By default, "Final Version (Large)" is selected. This means that it will take the images you have selected, find the final versions associated with them, and reprocess the images at the maximum size possible. This can take a significant amount of time when dealing with larger images, so you can choose at time of export to limit the maximum size in order to speed up processing.
The "Original Image" option will send exactly that, the file as it was brought into FSPro without modification. If you want to send the RAW file from your camera, this option will do that. IPTC data will NOT be applied to this image.
The "Final Version (Working)" option will send what's called the "Working Version". This is the file, usually a little below 2 megapixels, that you see when editing an image. FSPro uses these tinier versions internally to keep image editing quick. As such, they don't usually need to be reprocessed and can be saved very quickly.
The "Automation" option will send the .fsautomation associated with the Final Version. It is hoped that one day you will be able to send the original version and .fsautomation files, and then reprocess the image at the maximum possible quality setting on your desktop Mac. For now, these .fsautomation files can be brought back into FSPro through email, for example.
Once you've chosen which files you want this delivery point to send, tapping the configure destination options will bring up different options depending on the type of delivery point. For email, you can set a default list of email addresses to send to. For FTP, it has the server address, username/password, and default folder. Flickr and Dropbox both have login options.
Exporting Images
To export images, tap to select the images you wish to export, go to the 'export' tab, and tap on the destinations in the list you wish to check them. At this point, tapping the "Send Photos" button will begin processing and transferring all the selected photos to all the selected destinations.
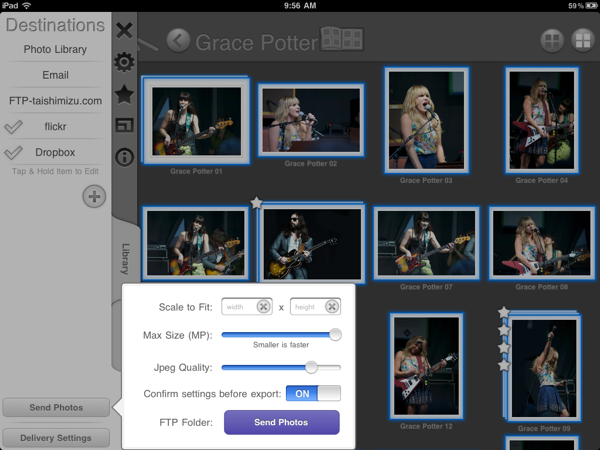
The "Delivery Settings" button will bring up a popover giving you options to scale all the images you're sending to fit into a certain pixel-sized box. You can also set the maximum size here. If you don't need extremely high resolution output, you can speed up the processing time by lowering the maximum size. You can also choose the JPEG quality, higher means larger file sizes, smaller means worse quality. Somewhere around 80% is usually a good compromise between the two. Finally you can set the option to confirm these settings each time before export.
iTunes Sharing
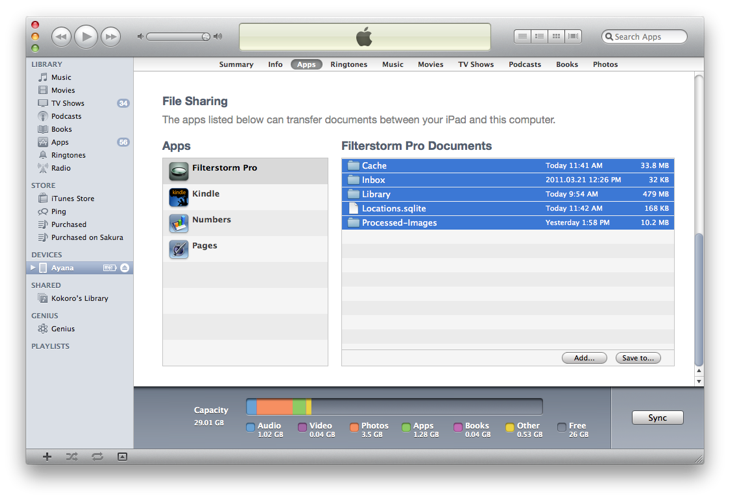
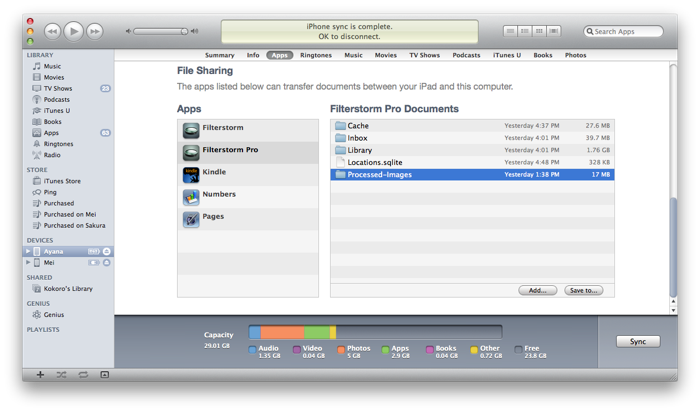
Importing photos to your computer through iTunes file sharing is for some an easier workflow than syncing with the iPad's camera roll. Every time an image is processed, it's saved into FSPro's processed-images folder. You can copy this folder to your computer from the file sharing section of the apps tab when syncing your iPad in iTunes. Images are processed whenever you export them to a destination with "Final Version (Large)" enabled, whether its FTP, email, or Dropbox. While there is currently no button to process an image without sending it somewhere (this will be added in an update), you can create an FTP destination with no address, and it will process the images then give you a message saying it could not connect to the server once done.
Saving Backups
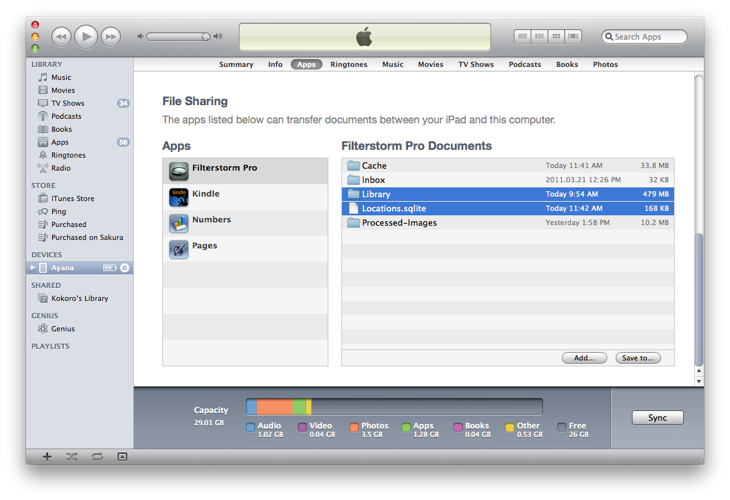
Saving Backups is easy, but not an obvious process. All the files relevant to FSPro can be accessed through iTunes in the file sharing section "Apps" tab as shown in the screenshot below. A backup consists of all of the contents of the library folder, as well as the Locations.sqlite file. Saving both to your computer's disk constitutes a backup.
Restoring From Backups
If you have a backup copy and want to restore FSPro to that state, go into app file sharing in iTunes as below. You may want to backup the current state of your library first, for which use the earlier instructions on this page. Delete all the existing files shown in the screenshot below so that it shows as being empty. Then take take the contents of the Library folder you backed up (not the folder itself), as well as the Locations.sqlite file, and copy them all into the iTunes file sharing window. Once that's complete, on your iPad, double tap the home button, find the FSPro icon in the list of running apps (if it is running), tap and hold it until the minus button appears, and then tap that to make sure FSPro is quit. The next time you open FSPro, it will detect there is a backup library present, and ask you if you want to restore from it.